October 29, 2026
Image Optimization Levels: Choose How Much Your 360° Photos Are Compressed
DEKO360 now lets you choose how much your 360° photos are compressed, from Original to Max savings, with an estimate of the data saved before you apply it.
A 360° photo is a big file, and a tour has many of them. Your viewers pay for that in waiting time and mobile data.
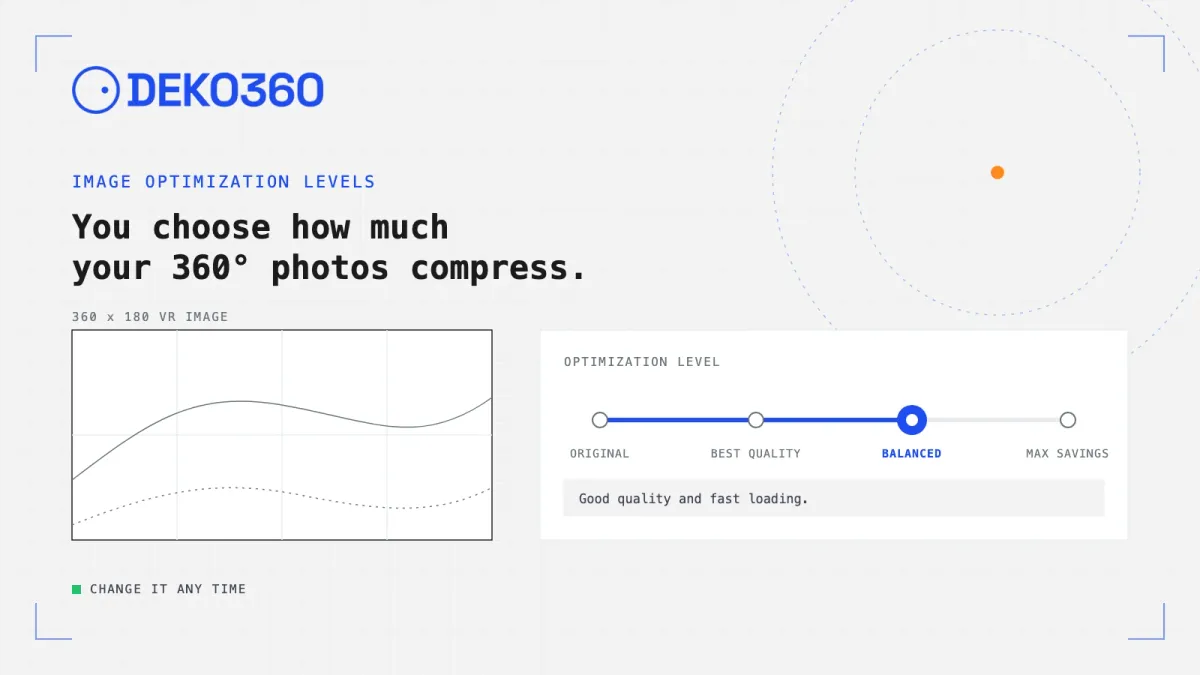
DEKO360 now lets you decide how much your 360° photos are compressed. Each VR tour, VR image and VR album has an image optimization level with four settings, a slider that shows the estimated data saved, and an Apply button. You pick the trade-off between detail and loading speed, and you can change your mind later.
Why Optimization Matters
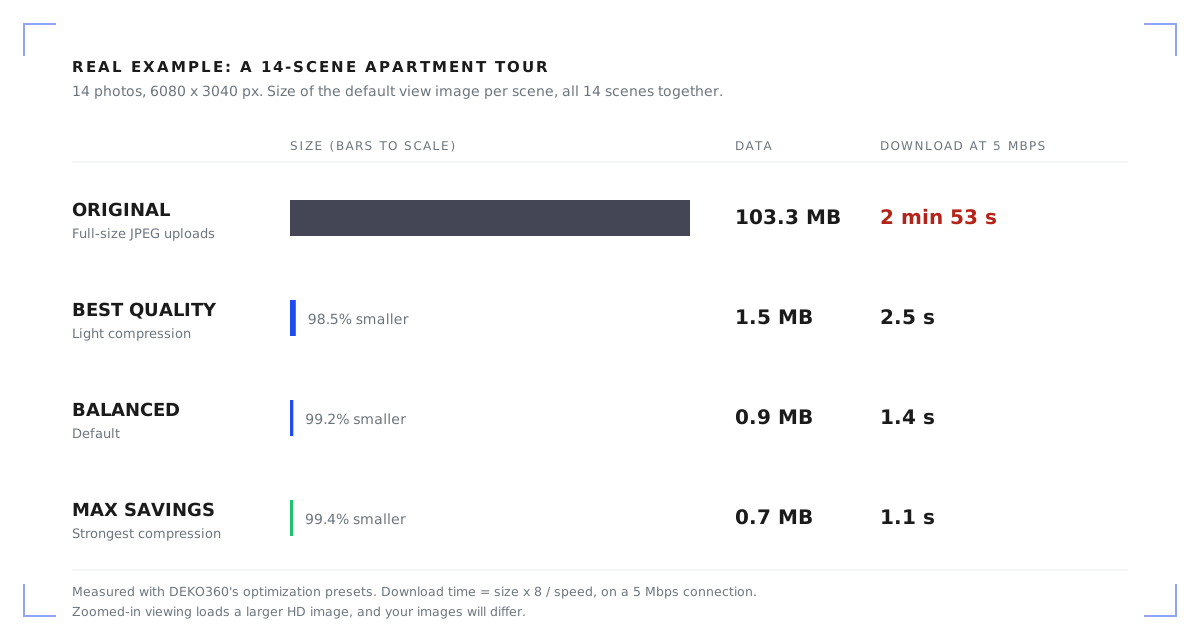
A raw image straight from a 360° camera can easily be over 30 MB. That is fine on your computer, but it is a lot to ask of someone opening your link on a phone. On an ordinary connection a single file that size takes a long time to arrive, and a tour has many scenes. Viewers stare at a loading screen, and many of them leave before the first scene appears.
Optimization fixes this by serving a smaller copy of each image. The picture still looks sharp at normal viewing sizes, but the download is a fraction of the original. Faster loading means more people actually see your tour, and it uses less of their mobile data.
The Four Levels
The slider has four stops. These are the names you see in the editor:
| Level | What it does |
|---|---|
| Original | No optimization. Viewers download the full-size images. |
| Best quality | Light compression. Keeps the most detail, smaller savings. |
| Balanced | Good quality and fast loading. This is the default. |
| Max savings | Strongest compression. Smallest files, fastest loading. |
Optimized images are compressed WebP copies that DEKO360 builds from your upload. Your original file is not replaced, which is why you can move between levels freely, including back to Original.
See the Savings Before You Commit
Moving the slider changes nothing for your viewers. It only updates an estimate under the slider, worded like this: About N% smaller (X → Y), where X is the size of your originals and Y is the estimated size at the level you picked. The estimate is calculated for your own item, so two tours will not show the same percentage. It is based on the default view image of one of your scenes, so treat it as an estimate rather than a guarantee.
When you like what you see, press Apply. If you are at Original, the editor shows roughly how much viewers download instead of a percentage.
Change It Any Time
The level is not a one-time choice. Open the image optimization section, pick another stop and press Apply. DEKO360 rebuilds the images in the background:
- Viewers are not interrupted. They keep getting the old files until the new ones are ready, so nothing goes blank mid-change.
- Anything already live updates once the images are rebuilt. You do not need to unpublish or re-upload.
- New scenes you add to a tour follow the tour’s level.
Choosing Where to Start
There is no single right answer. This is how we would think about it:
- Balanced is the default for a reason. Good quality and fast loading suits most tours and photos, and it is where new items start.
- Best quality fits work where fine detail is the product: architecture, interiors, anything a client will zoom into. You save less data, but you keep the most detail.
- Max savings fits tours that people open on phones and slow connections, or large tours where load time matters more than pixel peeping.
- Original is for when you want viewers to get your upload untouched, and you are happy for them to download the full file.
When You Publish
When you publish a draft, DEKO360 asks a question first: Serve optimized images? The dialog explains that optimized images load faster and use less of your viewers’ data, shows the same slider and estimate, and has one button labelled with your choice, such as Publish (Balanced). Pick Original on the slider if you want to go live with the full-size files.
You can always revisit the setting from the editor afterwards.
The “Heavy to Load” Banner
If you leave an item on Original and it is large, the editor tells you. A red banner appears at the top: This VR Tour is heavy to load. Click to optimize its images for faster loading. Click it and the same slider opens in a dialog, so you can fix it on the spot. You can also dismiss the banner.
It only appears while the item is on Original and large enough to be slow to load. Optimize it and the banner goes away.
Tours, VR Images and Albums
Optimization levels work across everything you host on DEKO360:
- VR tours have one level for the whole tour.
- Standalone VR images, part of free VR image hosting, each have their own level.
- VR albums apply the level you pick to every image in the album.
Tips for Faster, Better-Looking 360° Photos
- Pre-optimize in your 360 camera’s software. Before you upload, export your stitched photos from the camera’s own app or desktop software at a sensible resolution and quality instead of the largest the camera can produce. You get a faster upload and a smaller original to begin with, and DEKO360 can then optimize it further.
- Export as JPEG. DEKO360 accepts JPEG, PNG or WebP up to 100 MB. HEIC and RAW files are rejected, so convert them first.
- Keep the 2:1 shape. A 360° photo should be roughly twice as wide as it is tall (equirectangular). Don’t crop or stretch it, because a distorted image will not display as a proper 360° view. DEKO360 flags uploads that are not 360° or look stretched.
- Don’t compress twice more than you need to. If you already squeezed a photo hard in your camera software, pick Best quality or Balanced rather than Max savings, since stacking heavy compression can make the loss of detail visible.
- Match the level to your audience. Tours opened mostly on phones suit Balanced or Max savings. If viewers will zoom into fine detail, use Best quality. Check the estimate under the slider before you press Apply.
- Keep a backup of your full-resolution originals. You can always switch levels in DEKO360, but a copy of the camera files on your own drive is cheap insurance.
- Test on a phone. Open your published link on mobile data, not just on your office Wi-Fi, to see what your viewers will see.
Get Started
Open any tour, VR image or album in the editor, find the image optimization section and move the slider. The estimate updates as you go, and nothing changes for viewers until you press Apply. Try it on your next upload.